The Editor and its Components
The following screenshot shows the editor in use:
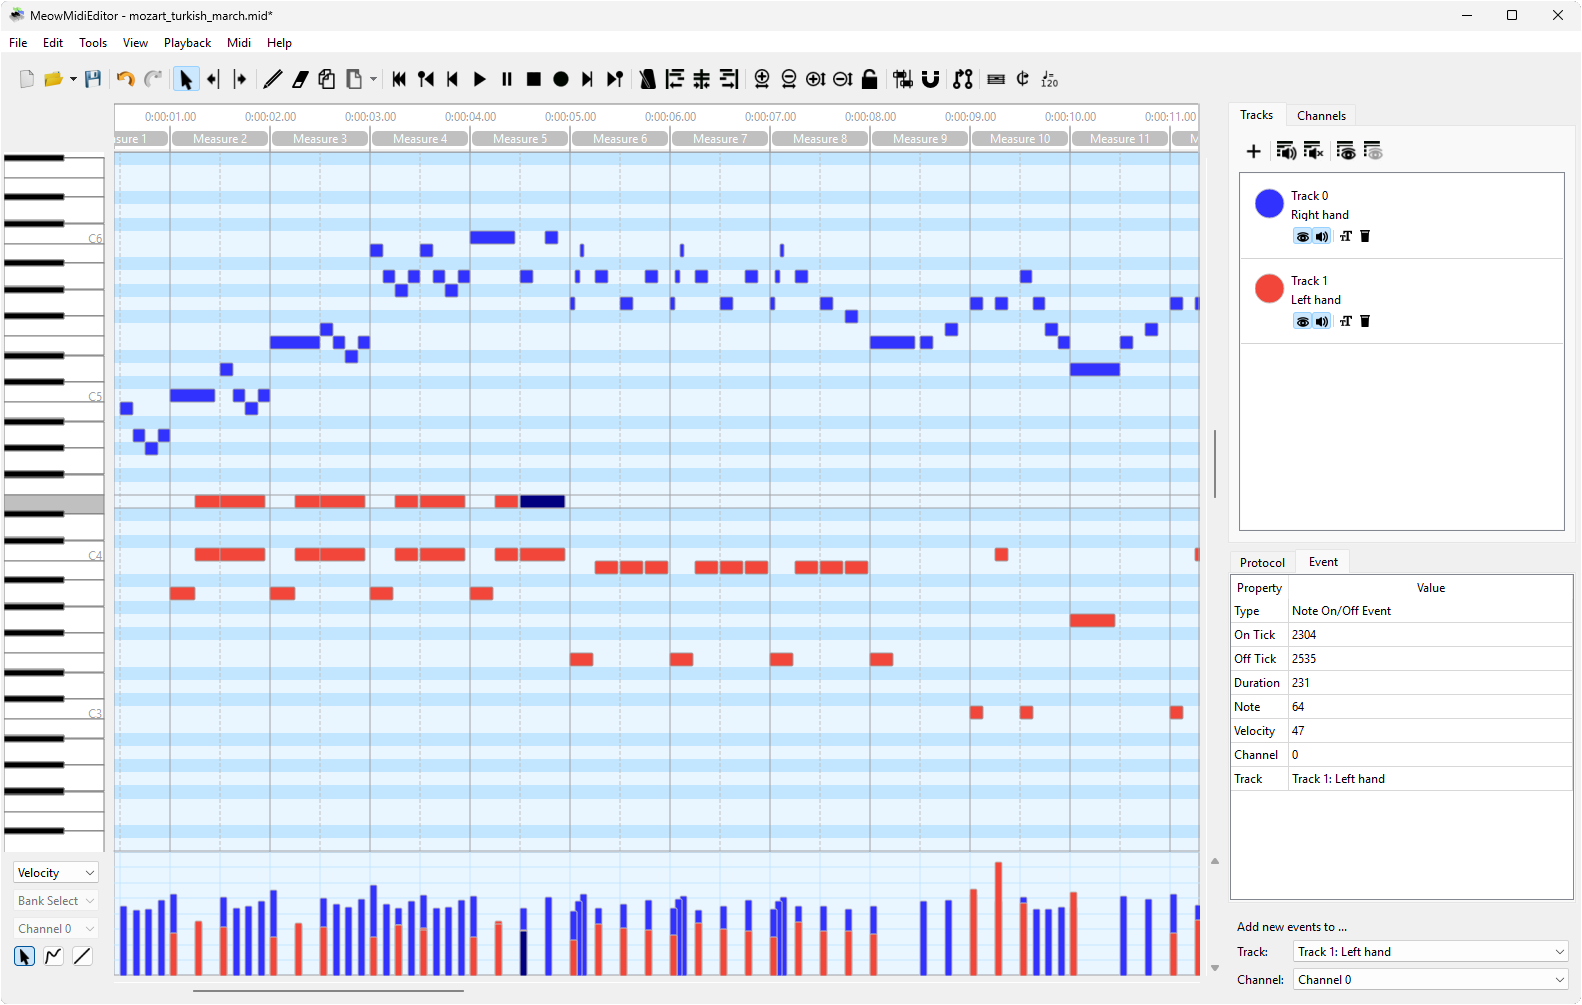
On the top of the editor there are the menubar and the toolbar which contain buttons to load and save files, to play the currently loaded file, or to edit the file's content. Moreover, the settings can be accessed from the menubar and additional tools, such as the metronome, can be controlled from the menues.
Below the toolbar, the mainscreen is split into two parts. On the left side, there is the event view, which shows all events, and a view which can be used to visualize and edit the velocity for each note as well as the different controller values, the pitch for each channel, or the key/channel pressure.
On the right side, there are different windows allowing the user to edit the tracks and channels, to visualize the protocol of all actions the user did, and to edit all properties of the selected event(s).
Menubar
Most actions which can be performed by the user are accessible using the menubar. The actions are structured within the following submenus. For the Tools menu, see the dedicated Tools Menu page.
📂 File Menu
 |
New Creates a new, empty MIDI file. |
 |
Open… Open an existing MIDI file. Also imports Guitar Pro ( .gp, .gp3, .gp4, .gp5, .gpx, .gtp), MusicXML (.musicxml, .xml, .mxl), and MuseScore (.mscz, .mscx) files - auto-converted to MIDI on open. See Supported Files. |
| Open recent… Open a recently opened file from the history list. |
|
 |
Save Save the current MIDI file. |
 |
Save as… Save the current MIDI file at a given path. |
| Export Audio… Render the current file to an audio file (WAV / FLAC / OGG / MP3) using the active SoundFont. Shortcut Ctrl+Shift+X. |
|
| Export MusicXML… Save the current file as MusicXML, openable in notation software such as MuseScore, Finale, Sibelius, or Dorico. |
|
| Collaboration Submenu for working on a file together: live sessions, pull requests and the session controls. See Collaboration. |
|
| Quit Close MidiEditor AI. |
✏️ Edit Menu
 |
Undo Undo the last action. |
 |
Redo Redo the last undone action. |
| Select all Select all currently visible events. |
|
| Select all events from channel… Select all events assigned to a given channel. |
|
| Select all events from track… Select all events assigned to a given track. |
|
| Navigate selection up / down / left / right Moves the selection to the neighbouring event with the arrow keys - up and down by pitch, left and right in time. |
|
 |
Copy events Copy all selected events to the clipboard. |
 |
Paste events Paste copied events from the clipboard. The first event starts at the cursor position. Use Paste options to control target track and channel. When the clipboard contains events from another MidiEditor instance, the Paste Special… dialog opens automatically so you can choose how source tracks and channels are mapped onto the current file. |
| Paste options… Choose whether pasted events keep their original track/channel or get assigned to a fixed track/channel. |
|
| Paste Special… Opens the cross-instance paste dialog. Pick Create new tracks per source, Preserve source mapping (1:1), or Paste to current edit track + channel. One Ctrl+Z reverts the paste and any newly created tracks together. |
|
| Ask MidiPilot… Opens the MidiPilot panel and moves focus to its input so you can type a request right away. |
|
 |
Settings… Opens the Settings dialog. |
👁️ View Menu
| Zoom… Zoom in/out horizontally and vertically, or restore default zoom settings. |
|
| Reset view Resets zoom, scroll position, and cursor to their defaults. |
|
| Compare View (side by side) Shows another open document next to the editor for comparison. See Tabs & Editor Groups. |
|
 |
Show all channels Sets all channels to visible. |
 |
Hide all channels Hides all channels. Events from hidden channels are not displayed. |
|
Show all tracks Sets all tracks to visible. |
|
Hide all tracks Hides all tracks. Events from hidden tracks are not displayed. |
| Colors… Choose whether event colors represent channels or tracks. See also Themes & Appearance. |
|
| Raster Customize the grid raster in the event view. Set to quarter notes, 8ths, 16ths, etc. See Magnet & Raster. |
|
| MidiPilot Shows or hides the MidiPilot AI assistant panel. Shortcut Ctrl+I. |
|
| Lyric Timeline Shows or hides the Lyric Timeline panel below the velocity lane. Shortcut Ctrl+L. |
|
| Show FFXIV Voice Lane Shows the voice-load graph beneath the piano roll, which plots the simultaneous voice count against the FFXIV voice ceiling. A companion entry, Auto-show FFXIV Voice Lane with FFXIV SoundFont Mode, shows the lane automatically while FFXIV SoundFont Mode is on. |
▶️ Playback Menu
Controls playback, recording, and the metronome. See the Playback & Recording page for full details.
🎹 MIDI Menu
|
Settings… Opens the Settings dialog for MIDI I/O configuration. |
 |
Connect MIDI In/Out Routes the input device to the output so played notes are audible. See details. |
| MIDI Panic Sends an all-notes-off signal to the output device. Silences stuck notes. |
Toolbar
The toolbar contains items from the menubar in order to provide quick access to the most frequently used actions.
Tabs & Editor Groups
Several documents can be open at once, each shown as its own tab. A New Tab button opens an additional empty document, and a Split button divides the editor area into two editor groups so two documents can be edited side by side, with their own tab strips. The same side-by-side layout is reachable from View → Compare View (side by side). For full details, see Tabs & Editor Groups.
Event View
The event view is the most important part of the editor. It visualizes the events in the loaded Midi file. Moreover, most editing can be done in this window.
All events are colored, where the colors can either be chosen to represent the event's channel or its track.
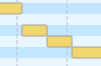
Notes are diplayed as bars. The rows of the event view represent the different notes according to the piano roll on the left. The horizontal length of a notes represents the note's duration according to the time line on the top of the window.
Below the notes the other events are shown. The row names below the piano roll indicate the event type shown in each row.
In order to edit the content of a Midi file, the user has to select a tool in the menubar or in the toolbar. After that, the user can select events in the event view and move the events, change the notes' durations, create new events, and remove events.
Below the event view, the velocities of all notes, the controllers, the key/channel pressure, and the pitch of each channel can be edited and visualized. The user can select the data to show and edit on the left of the window.
Context Menu - Visibility at a Glance
Right-clicking any note in the event view opens a context menu with quick reassignment shortcuts. Both the Move to Track and Move to Channel submenus carry a small visibility icon next to every entry, so you can see at a glance which tracks and channels are currently shown without first opening the side panels:
- - track or channel is currently visible (and audible)
- - track or channel is hidden
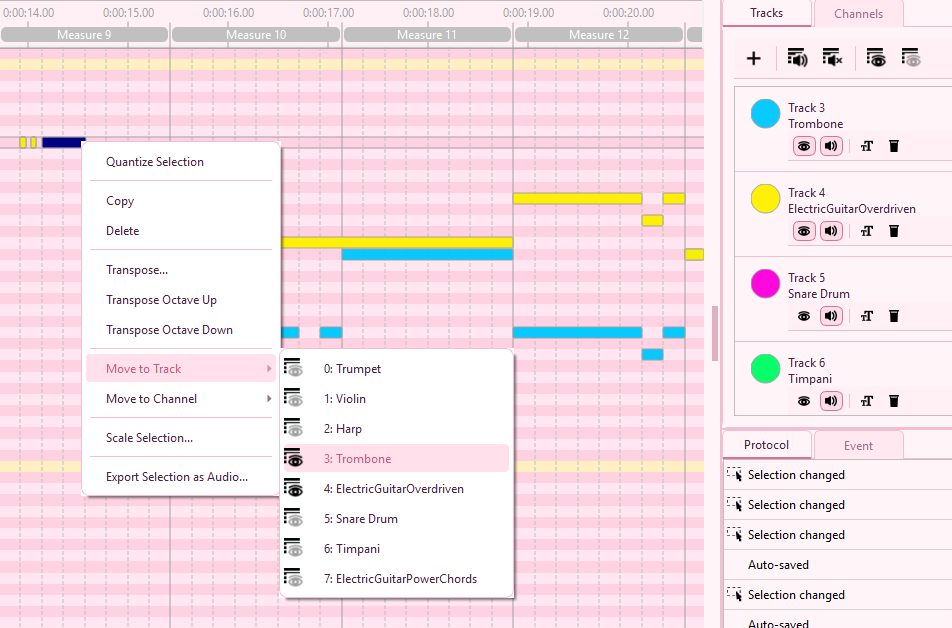
Eye icons indicate which tracks and channels are currently visible.
Track Editor
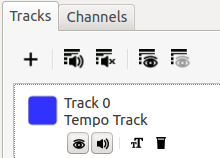
The track editor contains a list of all tracks in the currently loaded Midi file. The list shows
the names of the tracks as well as their numbers and the tracks' colors. Moreover, the track editor
enables the user to hide or mute specific channels (by clicking  and
and  ),
to rename a track (by clicking
),
to rename a track (by clicking  ) or to delete
a track (by clicking
) or to delete
a track (by clicking  ).
).
New tracks can be added to the Midi file by clicking  .
.
To change the order of the tracks, drag a track to a new place in the list - it lands where the insertion line is drawn, or at the end when you drop it below the last track. Any track can be moved, the first one included.
The first track holds the song-wide data: tempo changes, time and key signatures, markers, cue points and the copyright notice. When another track becomes the first one - because you move it up, move the first track down or remove the first track - it takes this data over, and everything that belongs to an instrument (notes, program changes, controllers, the track name, lyrics) stays with its track. Saved files keep the song-wide data in their first track, as other programs expect it there.
In order to mute or hide all tracks at once, the according actions above the track list can be used.
Track Context Menu
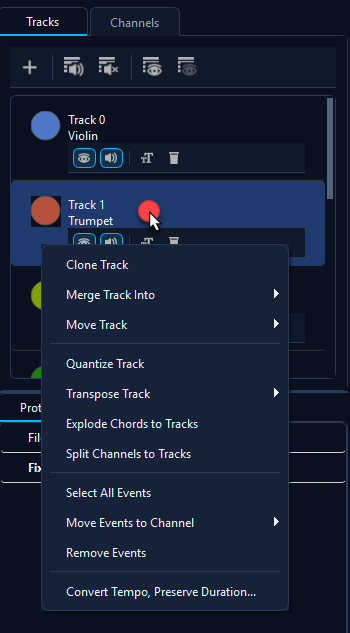
Right-clicking a track opens a context menu with the most common track operations, applied to the track under the cursor:
- Clone Track - duplicates the track including all of its events, placed right below the original (the song-wide data of the first track is not duplicated)
- Merge Track Into - moves all of the track's events onto another track and removes the source track (song-wide data stays with the first track)
- Move Track - moves the track one slot up or down in the list
- Quantize Track - quantizes every note of the track to the current quantization grid
- Transpose Track - transposes all notes of the track by a chosen interval, or a whole octave up/down
- Explode Chords to Tracks / Split Channels to Tracks - runs the split tools on this track
- Select All Events - selects every event of the track
- Move Events to Channel - moves all of the track's events onto a chosen MIDI channel
- Remove Events - clears the track's notes and its other channel events such as program changes, controllers and pitch bends (the track itself, its name and the song-wide data stay)
- Convert Tempo, Preserve Duration - opens the tempo conversion scoped to this track
Every operation is a single undo step, and none of them damages the song-wide data, so all of them work on the first track as well.
Please refer to Tracks and Channels for more details about the track editor.
Channel Editor
Similar to the track editor, a list of all channels is provided in the channel editor. Channels can be hidden or muted (by clicking and ). Moreover, the solo mode (by clicking  ) can be activated for a specific channel which will make the channel
be the only audible channel until the solo mode is deactivated.
) can be activated for a specific channel which will make the channel
be the only audible channel until the solo mode is deactivated.
As an instrument (or "voice") is assigned to each channel at each time, the channels' instruments can be assigned by clicking  . This will open a dialog which lets the user specify the instrument for the given channel.
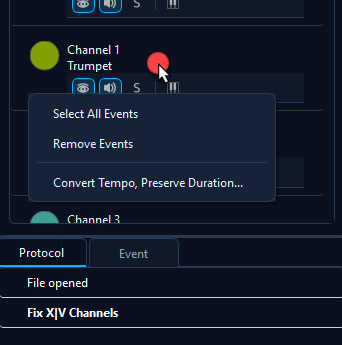
Right-clicking a channel opens a context menu with Select All Events (selects everything on the channel), Remove Events (clears the channel) and Convert Tempo, Preserve Duration (opens the tempo conversion scoped to this channel).
Please refer to Tracks and Channels for more details about the channel editor.
Event Editor
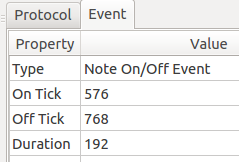
Once one or more events have been selected, the events' data will be visualized inside the event editor. The data is provided as a table containing property-value pairs. Double-clicking inside any value-field will allow the user to modify the propertie's value which will set the new value to all selected events immediately.
In the case of multiple selected events, the editor will only show the values which are equal for all selected events. Assigning new values to those initially empty values will set the value for all selected events.
Status Bar & Chord Detection
At the bottom of the editor window, the Status Bar displays contextual information about your current selection and position:
- Cursor position - the measure and beat the cursor sits on and its exact tick, written as
M:4 B:3 | T:2880 - Selection size - how many events are selected right now
- Chord analysis - automatically detects chords from the selected notes (major, minor, 7th, dim, aug, sus, and more). The field stays empty while the selection contains no notes or forms no chord the detector recognizes
- Undo memory - the active document's undo depth and what the undo history costs in memory, see below
The details of the selected events themselves - note number, velocity, duration and every other property - are shown in the event editor on the right.
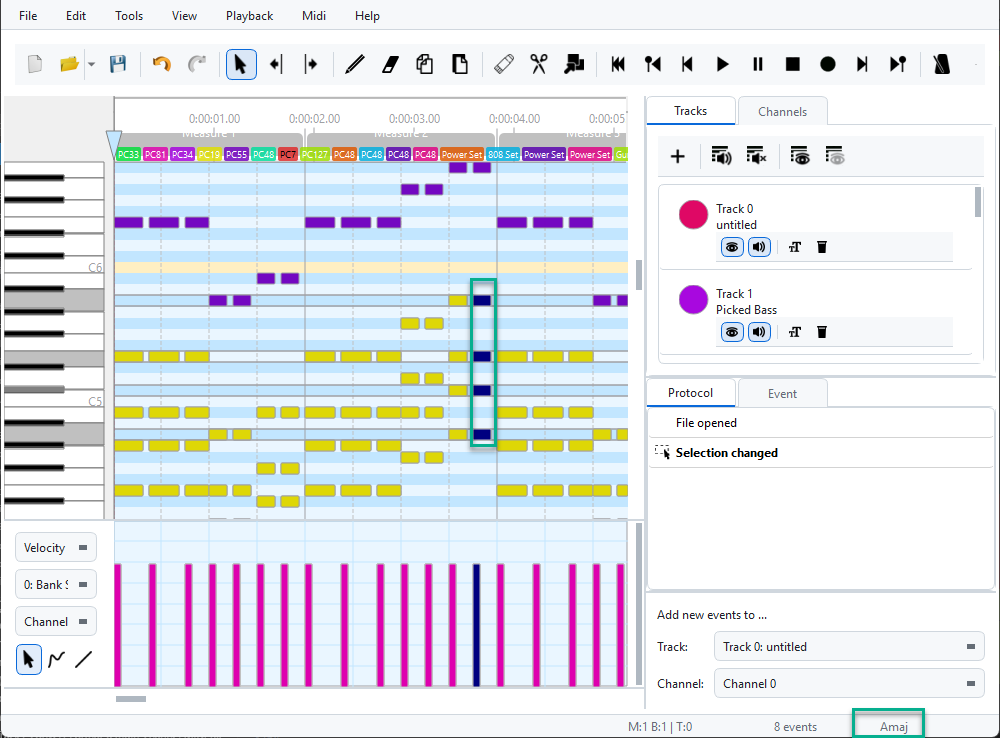
The status bar with chord detection - selecting notes shows the detected chord name.
Undo Memory
The right-hand end of the status bar carries an undo readout in the form Undo 42 | ~118 MB.
It refreshes about once a second and answers the question "how much undo history has this session
piled up?" without opening a task manager.
- The count is the active document's undo history - the same list the Protocol panel shows.
- The megabytes are an estimate for all open tabs together, across both editor groups. It counts the undo snapshots as the editor takes them, which is why it is prefixed with a tilde: the real memory the process uses is higher, and a task manager will always report more. It is a running total - it does not go down when steps are discarded (a new edit after Undo drops the redo steps, but the figure stays), so read it as an upper bound of what the undo history still holds.
The tooltip on the field spells out two things worth knowing:
- The figure does not drop when you press Undo. Undone steps stay in memory so that Redo can bring them back.
- Closing a tab lowers the figure, but not the memory. Only open tabs are counted, while a closed document's history stays allocated until you close the application.
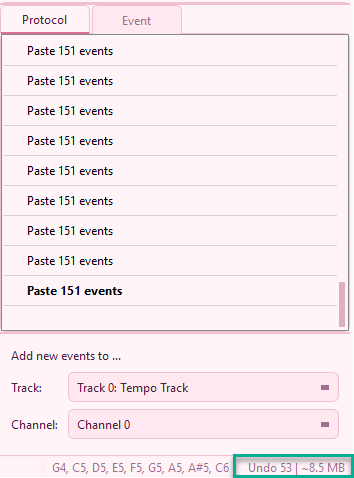
The Protocol tab lists the steps; the status bar below counts them and shows the memory they hold - here 53 steps at about 8.5 MB.